How to Insert Page Breaks in Word |
您所在的位置:网站首页 › how to display page breaks in word 2007 › How to Insert Page Breaks in Word |
How to Insert Page Breaks in Word
|
When you draft a document in Word, your text will flow from one page to the next as you type. If you delete text in one page, the gaps will fill up with text moving in from the next page. Word decides the amount of text a page can hold, and inserts an automatic page break to separate two pages. Sometimes, you may want to restrict blocks of text to one page, so they look and print the way you want them to. For this, it is necessary to insert manual page breaks. Microsoft Word has a page break tool that gives you control over where you want one page to end and the next one to begin. The tool has many kinds of page breaks, and we show you how you can effectively use them in your document. You may be drafting a new document, for instance, writing a book, and you have just finished a chapter. If you want the next chapter to begin on another page, you must insert a page break after the first page. Alternately, you may have inherited a document in which you would like to change the layout format, for which you want to insert a page break in between two existing paragraphs. We explain the two methods, and while doing so, we will also discuss the various types of breaks that Word allows you to insert: Insert page break in a new documentInsert page break in an existing documentPlease note, any type of page break present in the document is normally not visible. You must toggle the Show/Hide control for Word to show or hide them. Method #1: Inserting a page break in a new document Step #1: Open the Word documentOpen the Word document, and click on the Home tab on the top menu bar to change the ribbon. Click on the Show/Hide icon to allow all hidden items to become visible. Position the cursor at the end of the last paragraph on the page.  Step #2: Insert a page break
Click on the Insert tab on the top menu bar to change the ribbon. In the Pages section, click on Page Break. Word inserts a page break on a new line after the last paragraph, and moves the cursor to the beginning of the next page. 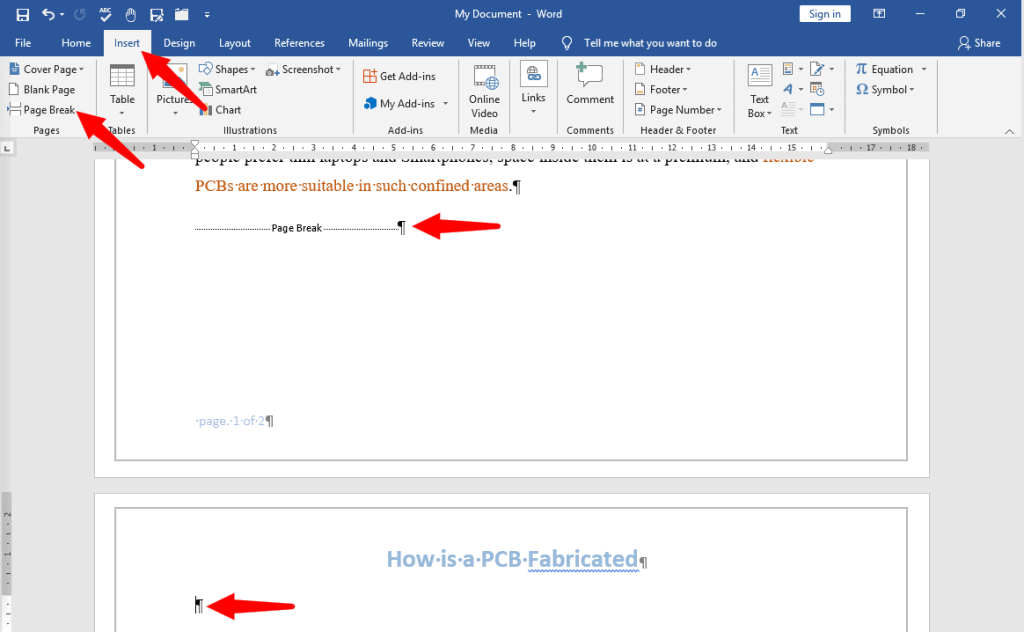
You can also insert a page break as above by pressing Ctrl+Enter on your keyboard. If you are using columns in your document, Word inserts a page break on a new line after the last paragraph and moves the cursor to the beginning of the next column. Method #2: Inserting a page break in an existing document Step #1: Open the Word documentOpen the Word document, and click on the Home tab on the top menu bar to change the ribbon. Click on the Show/Hide icon to allow all hidden items to become visible. Position the cursor at the end of the paragraph on the page where you want to insert the page break.  Step #2: Insert Page Break
Click on the Layout tab on the top menu bar to change the ribbon. In the Page Setup section, click on the tiny triangle on the right side of Breaks to open the Page Breaks and Section Breaks menu. 
Under Page Breaks options, Word offers three choices: PageColumnText WrappingPage鈥擳his break is for pages with regular text flow. If you click on Page, Word will shift the next paragraph following the cursor to the beginning of the next page, after adding a new line on the next page. Notice that the page break occurs at the end of the previous paragraph (and not on a new line as in Method #1, Step #2). You can add a heading on the new line for the next paragraph. 
Column鈥擳his break is for pages with columnar text flow. If you click on Column, Word will shift the next paragraph following the cursor to the beginning of the next column, after adding a new line. You can add a heading on the new line for the next paragraph. 
Text Wrapping鈥擳his break is for pages containing images and captions, where your text is flowing around the image and its caption. If you do not want the text from the next paragraph to also flow around the image, position your cursor at the end of the first paragraph containing the image and click on Text Wrapping. Word will shift the next paragraph to a place below the image where it can no longer flow around the image.  Step #3: Insert Section Breaks
Click on the Layout tab on the top menu bar to change the ribbon. In the Page Setup section, click on the tiny triangle on the right side of Breaks to open the Page Breaks and Section Breaks menu. 
Under Section Breaks options, Word offers four choices: Next PageContinuousEven PageOdd PageNext Page鈥擳his break is for pages with regular text flow, and is similar to the Page Break in Step #2. The difference is, when you click on Next Page, Word allows the next section following the cursor to use entirely different formatting from the previous section. For instance, you can have columns in the new section without disturbing the rest of the document. You can also change the new section to landscape orientation while the rest of the document retains its portrait orientation. 
Continuous鈥擳his break is also similar to the Page Break in Step #2. However, when you click on Continuous section break, Word creates the break at the cursor and moves the rest of the text below by another line on the same page. 
Even Page鈥擳his break is also similar to the Page Break in Step #2. However, when you click on the Even Page section break, Word creates the break at the cursor and moves the rest of the text below to the next even-numbered page. For instance, if you have inserted the even page section break in page #1, Word will move the rest of the text from the cursor to page #2. If you were on page #2 when you inserted the even number section break, Word will shift the rest of the text from the cursor to page #4 (skipping page #3). 
Odd Page鈥擳his break is also similar to the Page Break in Step #2. However, when you click on the Odd Page section break, Word creates the break at the cursor and moves the rest of the text below to the next odd-numbered page. For instance, if you have inserted the odd page section break in page #2, Word will move the rest of the text from the cursor to page #3. If you were on page #1 when you inserted the odd number section break, Word will shift the rest of the text from the cursor to page #3 (skipping page #2).  Conclusion
Beaks in a document allow formatting the document in the desired manner and help to retain the format even when you change the size of the fonts, or the page orientation. This is especially useful when printing the document鈥攜ou format the document with breaks just as you want it to display and print. |
【本文地址】